Activating Your MetaMask to get “The Seeker.”🦊

Step 1. Download MetaMask

Visit https://metamask.io/ and click Download.
2. Install MetaMask for your browser by clicking the "Install MetaMask for Chrome button."

This will take you to the Chrome Web store to download a browser extension. Make sure you are downloading from a trusted source.
3. Click "Add to Chrome.”
3. Click "Add to Chrome.”

4. Click “Add Extension.”

5. Now, it's installed! ✨

It should take you to a page like this. Click “Get Started.”
6. The extension is accessible in the top right corner of Google Chrome (with the puzzle piece icon).

Click that and you can click the pin to make it easier to find for future use.
7. After you pin the extension you'll see it in the top right of your browser. (the fox head).

Step 2. Create your Wallet
After installing MetaMask on your browser, you'll see a page resembling the one shown. If this is your first time using it, simply select "Create a Wallet."

2. You'll be prompted to decide whether to permit analytics collection. Opt for "No Thanks" if you prefer not to.
3. Following that, you'll create a password. This password will serve to unlock the MetaMask extension on your computer. Simply input your chosen password and click "Create."
4. After, you'll be guided to an informational video detailing how MetaMask operates and emphasizing the significance of your key. Take a moment to watch it for a better understanding.
Step 3. Back Up and Verify Your Secret Backup Phrase
1. Receive Your Secret Backup Phrase: This is a crucial step. You'll receive your Secret Backup Phrase, also known as a recovery phrase or wallet seed phrase.
It acts as your ultra-secret password, granting access to your wallet.
It acts as your ultra-secret password, granting access to your wallet.

2. Reveal the Secret Words: Click to reveal the secret words. This phrase consists of 12 words.
3. Back up your Secret Backup Phrase: Use a password manager or another secure method to store the phrase. (You can write it down somewhere but DO NOT LOSE IT.)
Confirmation: MetaMask will verify that you've backed up the phrase by testing it on the next screen5. Security Tips: Save a backup in multiple places.Never share the phrase with anyone.
Beware of phishing attempts; MetaMask will never spontaneously ask for your Secret Recovery Phrase.
If you need to back up your Secret Recovery Phrase again, you can find it in Settings -> Security.
✅ Completion: You've successfully created your wallet and backed up your seed phrase. Congratulations!
Step 4. Buying Ethereum to Pay for Gas
✅ Completion: You've successfully created your wallet and backed up your seed phrase. Congratulations!
Step 4. Buying Ethereum to Pay for Gas
1. Open the Browser Extension: Start by opening the MetaMask browser extension.

2. Find the 'Buy/Sell' Button: Look for the 'Buy/Sell' button on the left side of your wallet page within the extension.
3. Navigate to MetaMask Portfolio: Clicking the 'Buy/Sell' button will redirect you to the MetaMask Portfolio. If you're already on this page, you can skip this step.
4. Go to the 'Buy' Tab: Once you're in the MetaMask Portfolio, navigate to the 'Buy' tab.
5. Select Your Region: If you're a new user, you'll be prompted to choose your region, typically set to your current location by default.

6. Automatic Region Selection: If you've used MetaMask before, it will skip the region selection step and use the region you previously selected, which is saved on your device.
7. On the next screen, select your payment method (you can always adjust this afterward if you change your mind)

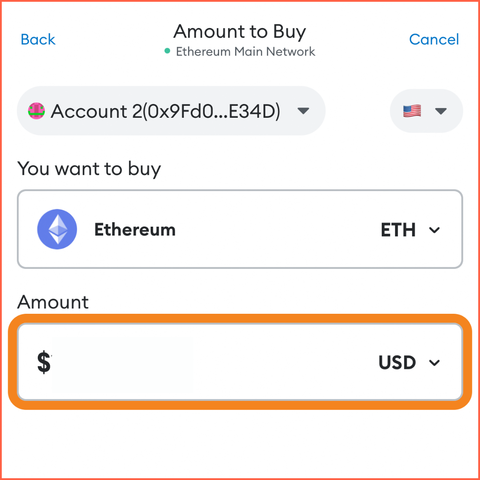
8. Choose the Token: Select the token you want to buy, such as Ethereum. You can do this by using the "You want to buy" field located at the top of the screen.

9. Enter the Amount: Input your desired amount, which represents the value (in fiat currency) of the token you want to purchase. For example, entering $10 should be sufficient to cover gas fee on Manifold.
10. When you select a provider, you might need to go through a process called KYC (Know Your Customer) if it's your first time using their service.

This typically involves providing identification documents to verify your identity and comply with regulations.
Success! 🦊
Step 5. Getting “The Seeker”
1. Go to this link: https://app.manifold.xyz/c/jd-the-seeker

2. Click “CLAIM NOW - FREE”
3. Enter the code I sent through the email.

4. Access Your MetaMask Wallet: Your MetaMask wallet should appear in your browser automatically. If it doesn't, click on the fox icon to open it. Then, click on "Sign the transaction." This will initiate the process to pay for the gas fees.
5. Ownership Confirmed: Congratulations! The Seeker is now yours.
Have any questions? Message me at anytime!
5. Ownership Confirmed: Congratulations! The Seeker is now yours.
Have any questions? Message me at anytime!


